We've launched the Experience Kit version 1
Go to the Experience Kit for React.
Activities
Service mapping
Show the step-by-step journey of your product or service in a visual way.
-
 3 to 10 people
-
 2 to 3 hours per session
Advice on service mapping
Why create a service map
Service maps can help:
- you to see the bigger picture of your product or service
- your team work together with a focus
- bring clarity in times of change
- make decisions obvious
- make knowledge accessible
- to quickly identify pain points and opportunities
- you involve stakeholders and agree how to progress together
Who is involved
People with a range of different perspectives and knowledge which usually includes:
- a facilitator
- team members with an understanding of the service
- subject matter experts
- people that input into the service
- service users
When to create a service map
You can do service mapping at all stages of product and service development.
Things you’ll need
A shared digital or physical space so that everyone can see and create the map together.
Digital or physical sticky notes and marker pens.
Any reference, data or other context that could help.
Tips on running the session
Provide the group with:
- visuals of what a service map looks like
- handouts with clear instructions if you think it will help
- copies of existing research if it is relevant
- time limits for each activity
Be as open as possible and make it clear that there is no wrong answer.
Get the team stood up and involved as soon as possible.
Be specific about what you want people to do, for example, where you want people to contribute or put their post-its.
Close the session at least 10 minutes before the end so that people have time to ask questions.
Learn more
Service mapping and different types of maps - Ben Holliday
Service mapping to make friends and influence people - Co-op Digital blog
How to create a service map
-
Welcome and introductions
Welcome everyone to the session. Ask everyone to introduce themselves if the group don’t know each other.
-
Introduce the aims for the session with your team, for example:
“We’re here to understand the bigger picture of the service (or product) that we are working on.”
-
Discuss any blockers or limitations, for example:
The service map might change as you go through the project - it takes a few versions to get the level of detail and format right.
-
Introduce the service mapping method using a visual example
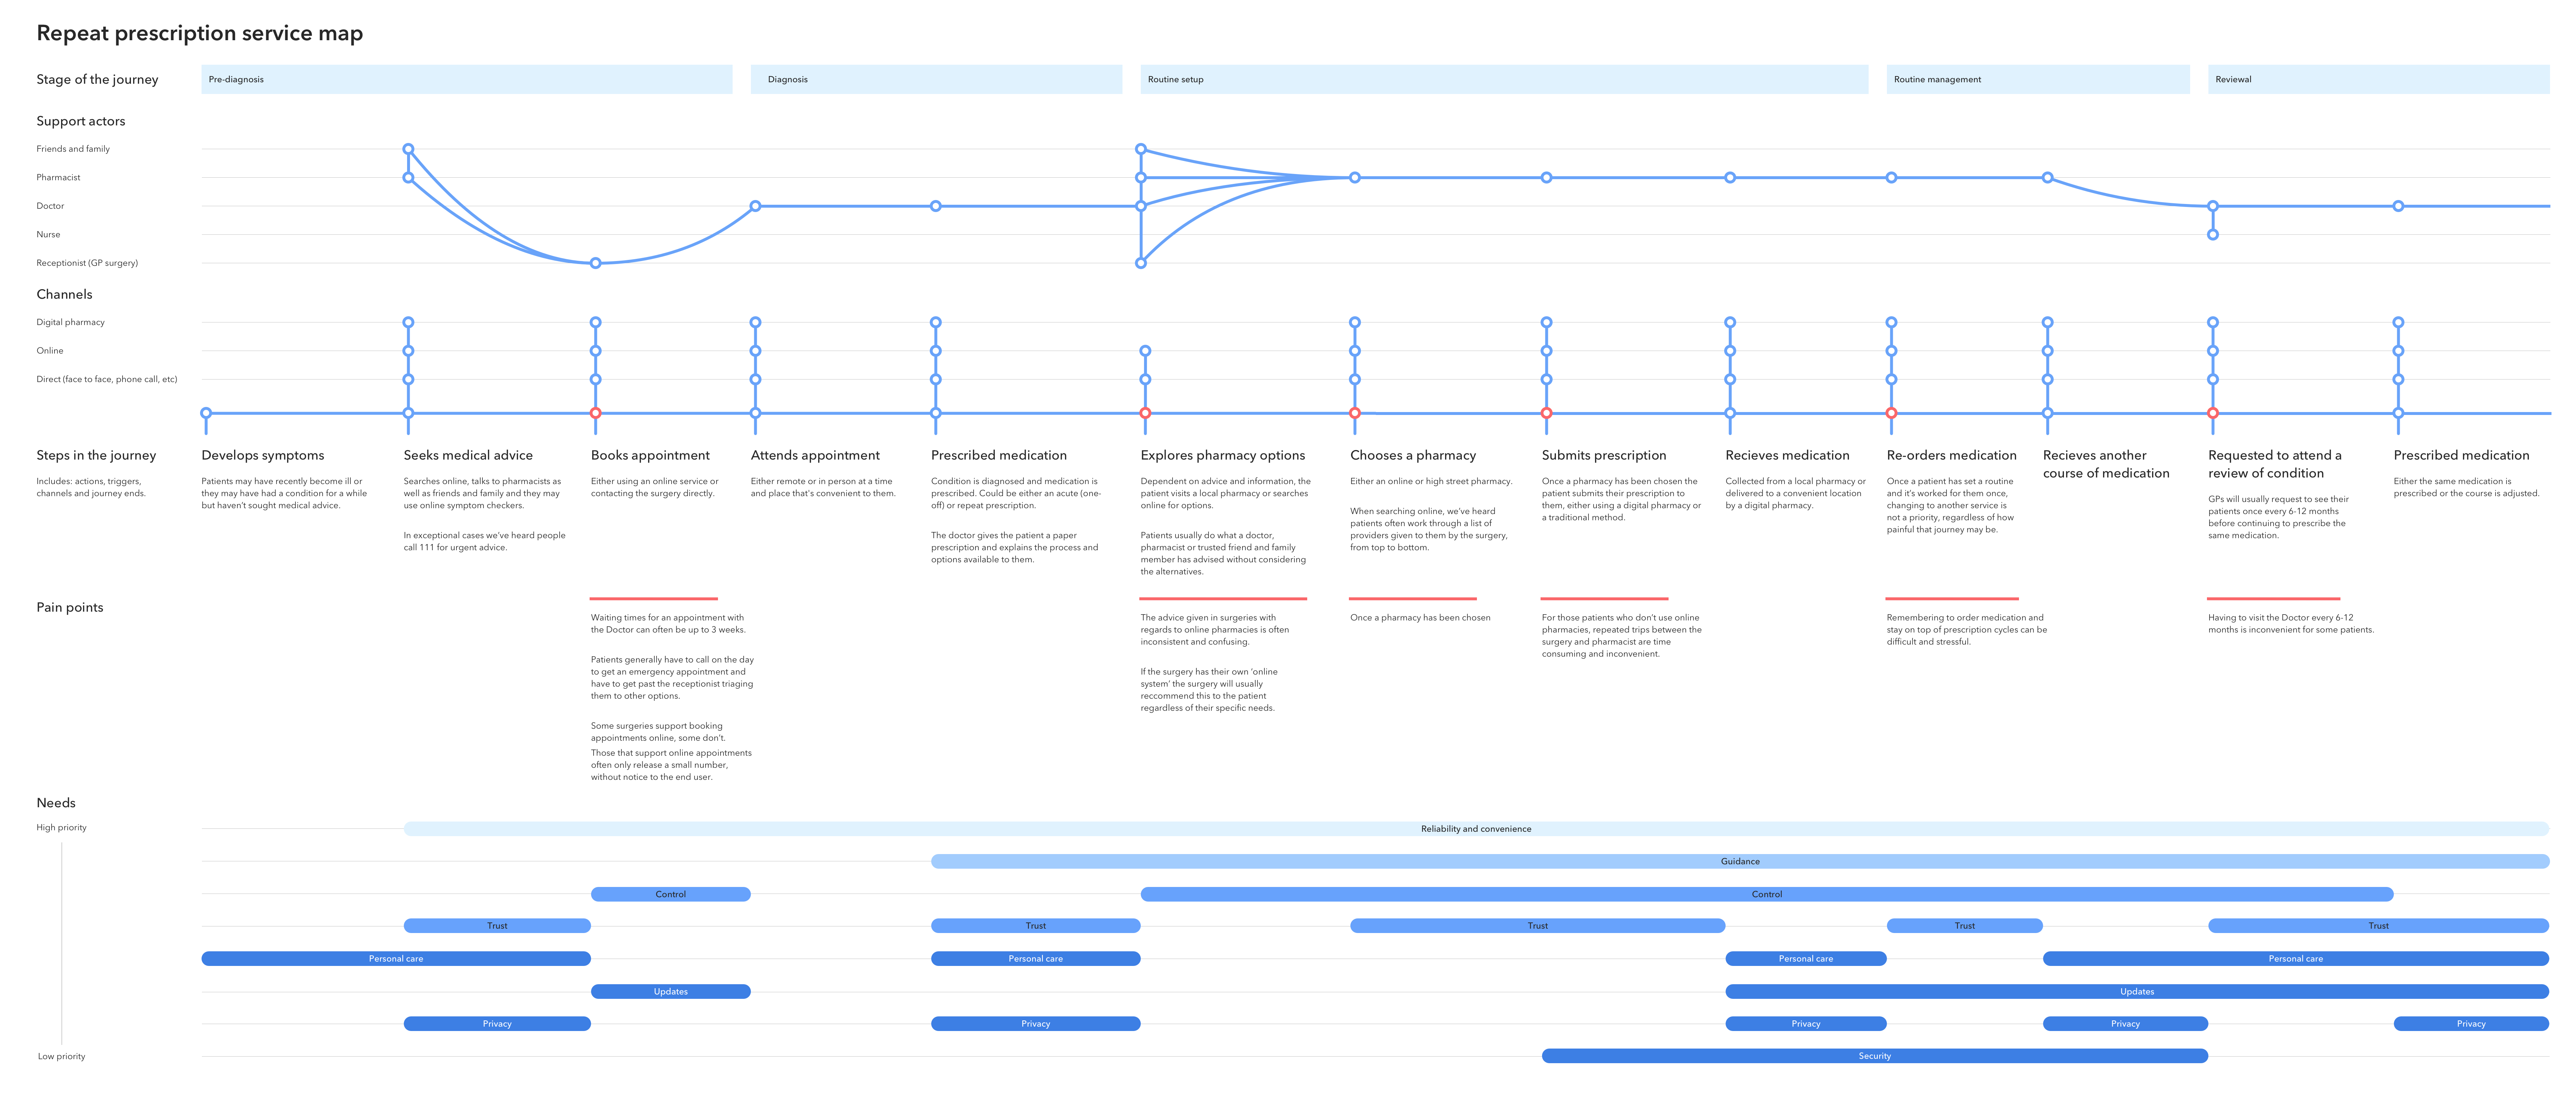
An example of a completed service map.
-
Explain that it is important to do the top row first, which is usually the ‘steps’ of a user journey or service.
It’s helpful if the facilitator asks the group to identify the steps and makes the notes on post-its to get the service map going. All the post-its in each row should be the same colour.
The top row of steps fall into stages or categories called ‘epics’. If you’re developing a digital product this could be: Awareness, Log on, Task and Log out.
Some participants have more experience of the subject matter than others. You could ask them to work on the area that they are more familiar with.
-
Now you can identify the service map rows that sit under the steps, for example:
- Who
- Action visible to user
- System
- Data available
- Pain points
- Opportunities to improve
You may not need all of these or you might need to add rows that are specific to your project.
Go through each layer or row type with examples.
Ask the group if they have any questions before you get started.
-
Fill in the service map
Get the team to write post-its and stick them up. Don't worry about getting things wrong, that's why we map out the service - to bring clarity!
-
Review the service map
Ask the team to look over and make any immediate changes or corrections you can. You might then need to do this again with different people that have different knowledge.
-
Close the session
Review the aims you set at the start of the session - is there increased clarity or knowledge?
Ask if anyone has any questions or would like you to explain anything.
Explain what will happen next.
-
Post session tasks
Digitise the map if you need to so that the steps and layers are neat and easy to follow.
Put the service map in a place where all your team can access it. Revisit it regularly, keep it updated, and use it to make decisions.
Transfer all pain points and ideas to a spreadsheet or synthesis board for tracking if it is valuable at this stage.
To decide what to work on next go to ways of working activities.